This is just a quick post to let you all know the petrol tank tap has been found!!!!! It had fallen into a box at work and was only found through dumb luck
Not got the link plates back from the plater so still waiting to put the fork back together, I've just asked a company on ebay about making friction discs that are the right size as I can't find anything. Most of the ones I've seen listed are imperial sizes and generally have a bigger OD and ID. For reference the Automoto discs are 50mm OD, 10mm ID and 3mm thick.
Saturday 29 November 2014
Friday 7 November 2014
Front Shock/Links
I managed to take the links to a plater and we decided to go with a brushed/satin nickel finish. I was really impressed by the knowledge and passion the guy has for making ugly parts shiny again. I was also pleased with the price quoted, once I've collected them (should be a couple of weeks - another pleasant surprise!) and I know the final price I'll stick it up for reference.


Here are the upper links with their bolts. It's the same set up as the rear pivot on the lower link; adjust with the bolt and lock with the locknut. The upper links are much simpler, basically a big piece of Mechano with on end tapped.
Today I managed to get the shock cleaned up and discovered that the lower section is (was) chromed. There was so much grease and road grime on it that it was completely black and the thought hadn't even crossed my mind that it would be chromed. The main spring was completely covered in grease so I got that cleaned up along with the inside of the top and lower sections. The spring has a bit of wear on the outside where it has rubbed the inside of the tubes. I can't really see it causing a problem to be honest but I'll have to wait and see. If it causes much noise I will use some heat shrink around it. This pic shows all of the parts, it really is a simple shock.
Whilst it was apart I thought I'd work out how much travel it gets (in theory). I reassembled the shock without the main spring but with the negative spring in it. At full length it was 220mm and at full compression it was 155mm. That gives 65mm of travel. BUT the main spring will push the negative spring back slightly, making the shock a little bit longer at full travel and the spring will most likely start to bind before it hits full travel so that number is pretty much just a guess. :)
(Sorry for the crappy pic on these two, trying to take pics left handed whilst holding the steel rule and my phone case trying to close on the lens isn't easy)
Once I was happy with how clean things were, they got greased back up and it all went back in the press (no pic as it's just the same as the taking it apart one) and the bolt put back in. Here's how it looks now
NB I keep calling it a 'shock' as that's what I'm used to on bicycles but technically this part is just the spring and has no damping in it.
Hopefully I'll be doing some work on the bike this week but we'll have to wait and see
M
Monday 3 November 2014
Forks
This post has been delayed more than I hoped and it still won't be as far on as planned. As mentioned in my previous post I've taken the forks apart to look at the shock, pivots and to get a closer look at the links to see if they need to be re-plated. Here's a pic of the linkage I took before I pulled it to pieces so I had a reference for reassembly, it's pretty obvious that the links are definitely going to need re-plating.

I didn't take any pics whilst I was taking it apart, it was all pretty simple - lock nuts on one end and the axle un-threads from the link on that side through a clearance hole in the other link. This is the lower pivot reassembled but without the fork legs in place. I'm going to need to sort new friction discs as they are really hard and brittle, I'm not sure if they're leather or something else but I'm doing some research to find out. The lower pivot is adjusted underneath the black knob then the black knob adjust the amount of friction to damp the suspension action. The star shaped washer applies spring tension and the little clip holds the black knob in place. The upper pivot is much simpler and is just adjusted using the hex end of the axle then locked off with the locknut on the other end.


 The other reason to take the forks to pieces was to have a look at the shock. At first I couldn't see how it was hold together but looking down the end of the small tube on the front (visible in the pics above) I saw spanner flats. Annoyingly there were only two so I couldn't use a socket down the tube to unscrew it. The only way to access it was to squash the whole thing in a press then unscrew that bolt, which also held a negative spring, then the whole shock came apart.In this pic you can see the top of the bolt above the smaller tube, typically for this stupid French bike it's needs an 11mm spanner and the bolt can't be removed because of the grease nipple above. Once I got it out of the press I did have a quick look inside but didn't take any pics.

Whilst it is all apart I will be putting new ball bearings (interestingly still imperial sized balls despite being a metric bike, does ANYONE use metric balls?), re-greasing and adjusting the headset. Once again I didn't take any pics but I'll try to get some when it goes back together.
I also had a quick look at the front hub; the bearings are fine but the brake shoes need relining. I'm guessing the rears won't be as bad but if I'm doing the front I'll sort them all.
And that's where the post is being cut short. I've been busy and then ill so I've not managed to pull the shock fully apart to clean it up and I've hit a slight dead end with the plating for the links. I tried one firm but they wanted £75+ and couldn't guarantee the price until they started the work. I've since found another company specialising in motorbike parts so hopefully that works out better. I'm planning to go with a satin/brushed nickel as I think bright shiny chrome will stand out compared to the rest of the bike. My back up plan is to get new links laser or waterjet cut out of stainless steel and either blast or brush them to get the desired look.
I'm not sure what my next post will cover as I've now started a couple of things without finishing them, first the engine/fuel system and now the forks/shock/headset. I think I will go back and look at the engine and try to work out what I need to order to get that running. I can't remember if I had explained before but the HT lead I ordered doesn't fit (stupid French engine!), I don't know how to set the timing or the carb and I've managed to lose the petrol tap from the tank. The first couple shouldn't be too much of a problem but I think I've right royally ballsed up by miss-placing the petrol tap, I can't see it being that easy to track one down. The broken clutch adjuster has been helicoiled so the cover is ready to go back on when I next work on the bike. If I manage to sort those bits out, it might mean the engine will be running before Christmas, it's just a shame it's going to be in a bike with no forks!
M
I didn't take any pics whilst I was taking it apart, it was all pretty simple - lock nuts on one end and the axle un-threads from the link on that side through a clearance hole in the other link. This is the lower pivot reassembled but without the fork legs in place. I'm going to need to sort new friction discs as they are really hard and brittle, I'm not sure if they're leather or something else but I'm doing some research to find out. The lower pivot is adjusted underneath the black knob then the black knob adjust the amount of friction to damp the suspension action. The star shaped washer applies spring tension and the little clip holds the black knob in place. The upper pivot is much simpler and is just adjusted using the hex end of the axle then locked off with the locknut on the other end.
Whilst it is all apart I will be putting new ball bearings (interestingly still imperial sized balls despite being a metric bike, does ANYONE use metric balls?), re-greasing and adjusting the headset. Once again I didn't take any pics but I'll try to get some when it goes back together.
I also had a quick look at the front hub; the bearings are fine but the brake shoes need relining. I'm guessing the rears won't be as bad but if I'm doing the front I'll sort them all.
And that's where the post is being cut short. I've been busy and then ill so I've not managed to pull the shock fully apart to clean it up and I've hit a slight dead end with the plating for the links. I tried one firm but they wanted £75+ and couldn't guarantee the price until they started the work. I've since found another company specialising in motorbike parts so hopefully that works out better. I'm planning to go with a satin/brushed nickel as I think bright shiny chrome will stand out compared to the rest of the bike. My back up plan is to get new links laser or waterjet cut out of stainless steel and either blast or brush them to get the desired look.
I'm not sure what my next post will cover as I've now started a couple of things without finishing them, first the engine/fuel system and now the forks/shock/headset. I think I will go back and look at the engine and try to work out what I need to order to get that running. I can't remember if I had explained before but the HT lead I ordered doesn't fit (stupid French engine!), I don't know how to set the timing or the carb and I've managed to lose the petrol tap from the tank. The first couple shouldn't be too much of a problem but I think I've right royally ballsed up by miss-placing the petrol tap, I can't see it being that easy to track one down. The broken clutch adjuster has been helicoiled so the cover is ready to go back on when I next work on the bike. If I manage to sort those bits out, it might mean the engine will be running before Christmas, it's just a shame it's going to be in a bike with no forks!
M
Saturday 18 October 2014
Headbadge choice and forks
I've managed to get 2 headbadges from French eBay and I need help deciding which should go on the bike. They are both originally from bicycles as the motorbike ones were different, but I couldn't care less about that as they look cool.


So which one, this:
or this one:
P.S. I know which one I think it should have and 90% of the people I've asked have agreed with me but please comment anyway, I value your opinion (even if it's wrong and I choose to ignore it)
I've also taken the forks apart and I'm trying to get some new friction washers and get the side plates replated, I'll do a full post on the forks once I've got the bits to put them back together
M
M
Saturday 4 October 2014
Engine Rebuild part 2 (Plus the Distinguished Gentlemans Ride, Sheffield 2014)
Once the new bearings arrived I realised the replacement seals I had ordered weren't right - the engine had metric sized seals that were much larger than the imperial ones supplied. I found some online and got them ordered. This meant that the engine rebuild was done in a little bit of a hurry on the Friday night before the Distinguished Gentleman's Ride, which was on the Sunday and I was at work Saturday daytime and out Saturday evening which didn't leave me much time to rebuild the engine and reassemble the bike. I didn't take any pictures of the rebuild process as I was trying to get it done but everything went quite smoothly, except for the reassembly of the gearbox which took about two hours to get right. It was a case of getting the gear selector mechanism in the right place and getting the cover on without it all moving. I must have had the gearbox apart and back together 10 or 15 times but I got there in the end.
I then realised a couple more differences with the French made engine vs it's English equivalent. The points are different, no big issue but I'll probably not be able to change them so fingers crossed on that one. The other one is the HT lead connection at the magneto is different but I should be able to modify the supplied on to fit. Obviously both of these are related and for some reason the French thought they'd do the ignition differently. I'm going to investigate whether the points and lead from a similar era Peugeot (who owned Automoto at the time my bike was made) will fit if they are available.
This meant the engine wasn't going to run for the Gents ride but I still decided to take the bike along for people to have a butchers at, there was just one problem with that, the bike had no engine, tank, seat, exhaust, rear wheel or chain case and I would only have a few hours on Sunday morning to sort it. Luckily everything went fine and I did get the bike back together and even managed to join the MTB ride before heading up to the main event.


Dressing up was mandatory, luckily I already had a modified suit from a recent wedding in the south of France.
After the MTB ride I put the Automoto in the van and drove to meet everyone (including the bikers) at the finish venue. I got there quite early so got the bike out of the van ready for people to look at and I have to say it looked good in the late afternoon sun. considering this was late September in Sheffield the weather was unbelievable.
After a while the guys on the motorbike started to arrive in dribs and drabs. The first group included this brilliant Norton. As I took a picture of it someone arrive on a blue CX500 and drifted across the grass right behind it (you can just see their helmet), as it came in all I could see in my mind was him taking the Norton out but luckily he missed it.
It was easily my favourite bike and it got the best bike award too! I didn't take many pictures as I got chatting to lots of people, including someone who wanted to buy the Automoto. I'm sure there are plenty of pics of the day floating around on the interweb so have a google and you'll find stuff. One I particularly like is this one stolen from JohnnyMalco on instagram
LoadingSheffield #dgr2014 #gentlemansride went off! Amazing times! Cheers @baybutt !
I made the mistake of saying (to too many people) that I will be riding the bike at next years event so that gives me a solid deadline for getting the bike running although I'm hoping to get it on the road before then
Sunday 21 September 2014
Engine rebuild part 1 (of many probably!)
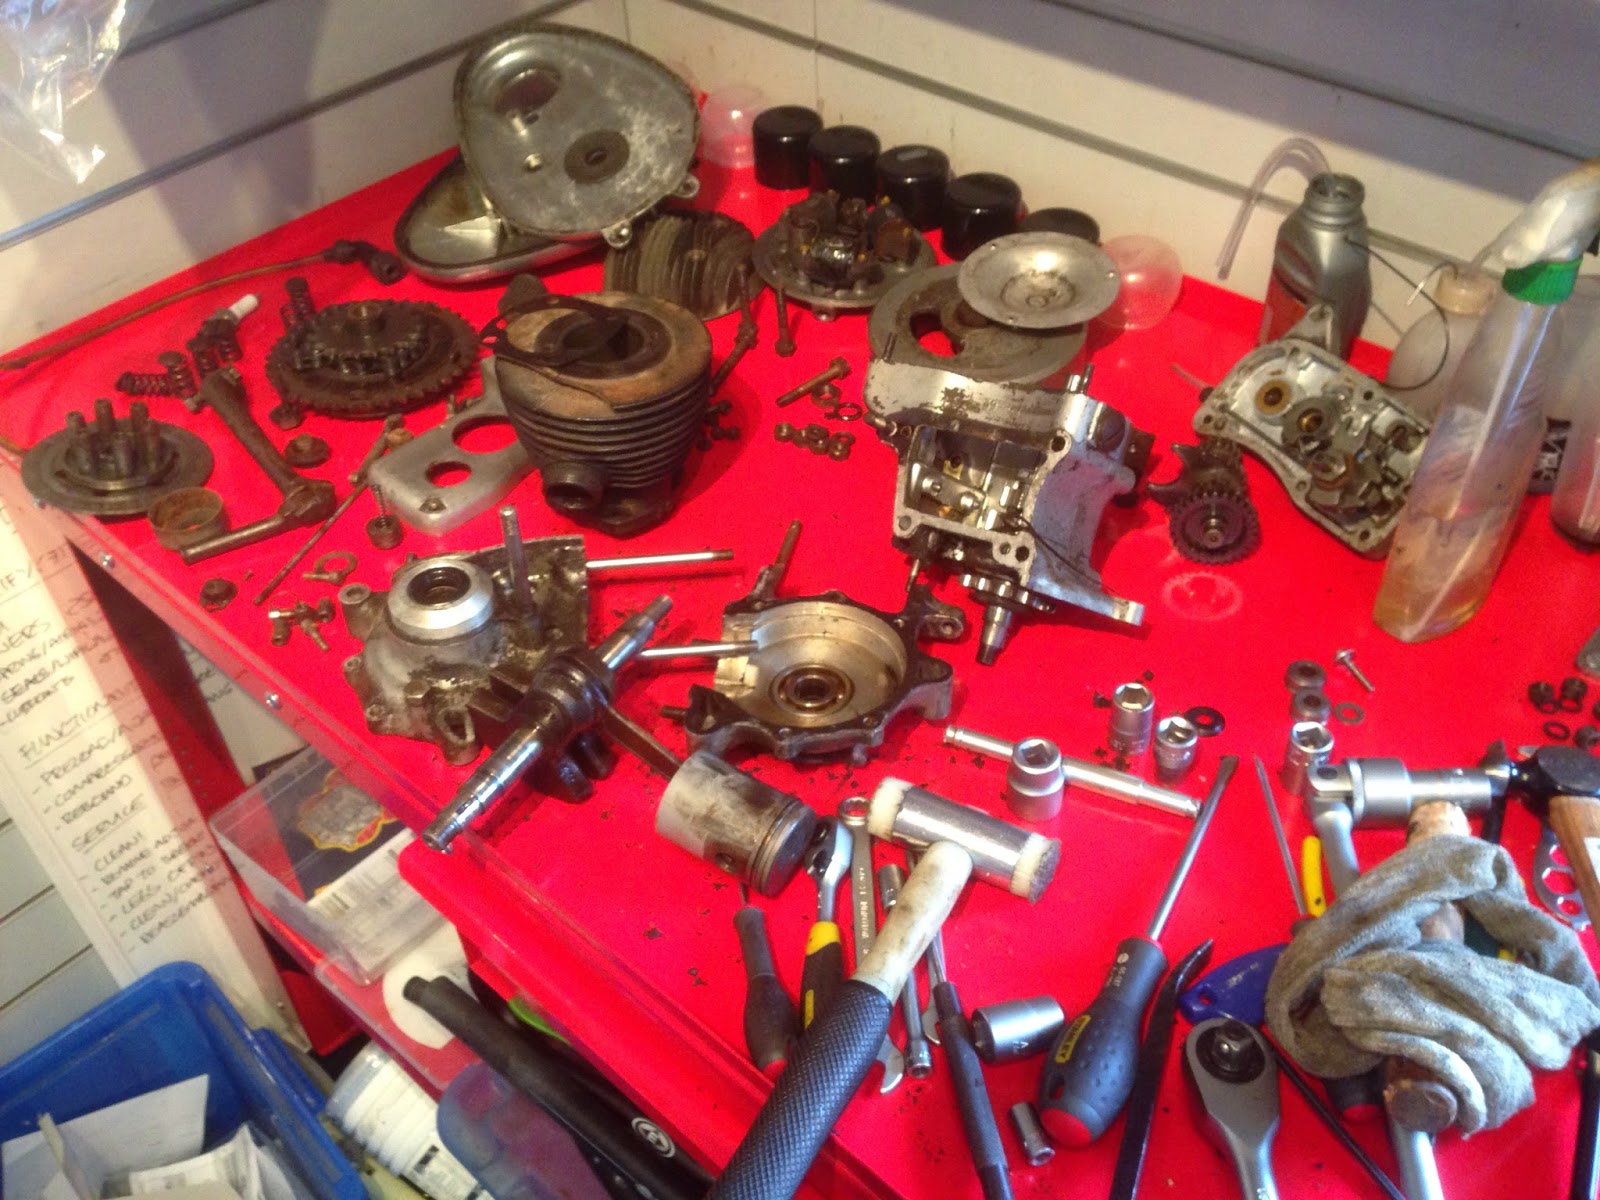
So the engine is out and I've had the delivery of parts (including an extra delivery for the forgotten corks) so I took the engine to work and started stripping it down. I didn't get many pictures of the process but I basically started by taking off the most obvious bits first and kept going until I had nothing left to remove. I did get stuck at a few points though. The first interesting thing I found was that I was correct to order a replacement kickstart spring as there wasn't one fitted at all! There were two main problem areas, first was the main drive sprocket on the crankshaft and second was the clutch carrier (not sure of the real name). The sprocket was done up really tight and I couldn't stop the crankshaft from rotating. After several failed attempts and a bit of head scratching I took it round to the local car garage and the nut was off in seconds using their air powered impact driver. The sprocket was on the further shaft in the pic below, the part with 6 stubs coming out of it is the clutch carrier and was the next problem I had to overcome.

The nut was nowhere near as tight and I could use a pry bar in the stubs to stop it rotating so that came off really quickly. Another trip round to the garage resulted in a suitable puller, but the first attempt failed when one of the bolts I used failed. A phone call to Villiers Services (who I had ordered the spares from) confirmed that it is on a taper and simply needs enough force (and maybe a bit of heat) to get it to come off. They described their set up and it sounded exactly like mine, only with decent bolts. The taper fit is apparently an interesting quirk of Villiers engines made under license, a Villiers made engine would have a splined fit and wouldn't need to be pulled off. Some better quality bolts were found, the puller borrowed again and I was ready to try again.

It's a little bit of a 'hammer to crack a nut' but it worked. It made an almighty bang when it did release (the other guys in the shop thought I'd shot myself and I thought I'd broken something) but I'm guessing it's not been off since the engine was built so it's not a big surprise it made some noise. I could then continue with the strip down and got the whole thing apart.
I then realised that the main bearings (particularly the chain side where there are two) are a little rough so I've ordered replacements as they are only about £4 each (I need 3). They're pretty sizeable beasts for such a small engine so it's a little bit odd they've gone but since they're so cheap I really don't mind replacing them.

Whilst checking over the rest of the parts I had a closer look at the clutch adjuster which is renowned for being broken off by the kickstart. Mine was still intact so I decided to check it still turned so I'd be able to adjust the clutch. As soon as I tried the knob came off in my hand, on closer inspection the bolt had been cracked a long time and was only held together by about 10% of the material. This gives me a bit of a dilemma as I will need to be able to adjust the clutch but I can only find brand new (freshly chromed) adjusters which I'm not convinced will look right on the bike. The quality of the chrome doesn't look amazing (linky) but I still think it will look out of place. I could always rebuild it as it is so it will run for next Sunday and then address the adjuster at a later date. Either way I need to remove the broken stub which isn't going to be easy. If anyone has an opinion on the adjuster and how it will look, please comment. Actually, if you have anything to say about any aspect of the bike please let me know
The nut was nowhere near as tight and I could use a pry bar in the stubs to stop it rotating so that came off really quickly. Another trip round to the garage resulted in a suitable puller, but the first attempt failed when one of the bolts I used failed. A phone call to Villiers Services (who I had ordered the spares from) confirmed that it is on a taper and simply needs enough force (and maybe a bit of heat) to get it to come off. They described their set up and it sounded exactly like mine, only with decent bolts. The taper fit is apparently an interesting quirk of Villiers engines made under license, a Villiers made engine would have a splined fit and wouldn't need to be pulled off. Some better quality bolts were found, the puller borrowed again and I was ready to try again.
It's a little bit of a 'hammer to crack a nut' but it worked. It made an almighty bang when it did release (the other guys in the shop thought I'd shot myself and I thought I'd broken something) but I'm guessing it's not been off since the engine was built so it's not a big surprise it made some noise. I could then continue with the strip down and got the whole thing apart.
I then realised that the main bearings (particularly the chain side where there are two) are a little rough so I've ordered replacements as they are only about £4 each (I need 3). They're pretty sizeable beasts for such a small engine so it's a little bit odd they've gone but since they're so cheap I really don't mind replacing them.
Whilst checking over the rest of the parts I had a closer look at the clutch adjuster which is renowned for being broken off by the kickstart. Mine was still intact so I decided to check it still turned so I'd be able to adjust the clutch. As soon as I tried the knob came off in my hand, on closer inspection the bolt had been cracked a long time and was only held together by about 10% of the material. This gives me a bit of a dilemma as I will need to be able to adjust the clutch but I can only find brand new (freshly chromed) adjusters which I'm not convinced will look right on the bike. The quality of the chrome doesn't look amazing (linky) but I still think it will look out of place. I could always rebuild it as it is so it will run for next Sunday and then address the adjuster at a later date. Either way I need to remove the broken stub which isn't going to be easy. If anyone has an opinion on the adjuster and how it will look, please comment. Actually, if you have anything to say about any aspect of the bike please let me know
Made some progress
Having realised I didn't have long to get the bike running for the Distinguished Gentleman's Ride, I decided to pull the engine out and get started on the rebuild.
Taking the engine out was a little trickier than I thought it would be. Although the engine is only mounted by 3 bolts (more about them later) I had to remove quite a few other bits to get it out. Luckily I had already removed the tank and carb so that gave me a bit more room to work. Before I got too far into it, I decided to have a look in the primary drive case simply because it's the easiest bit of the engine to have a look in. I was pleasantly surprised to find a nice clean chain that still had oil on it! I also realised I hadn't ordered enough clutch corks (I had order enough for one plate but it turns out there are two).

Once I had a bit of a nosey the cover went back on and it was back to taking the engine out. I didn't see the split link in the chain as it was covered by the chaincase so I decided to just take the chain out with the engine; it doesn't loop around the frame so doesn't have to be split. This meant I had to take the rear wheel out, which meant that the rear section of mudguard had to come off. With the rear wheel out and the chaincase removed the engine was only held in by it's mounting bolts. I had removed the front two, but the rear mount (behind the gearbox) didn't want to come out. The bolt goes in from the right hand side of the bike with a nut on the left. With the nut removed the bolt would turn, but wouldn't come out. Normally I would tap the end of the bolt with a drift but I couldn't get anything in because the primary drive case is in the way. I attempted to apply some pressure to the end of the bolt with a pry bar but I couldn't apply enough pressure or shock the bolt to get it to come out. I decided to have a think and come back to it.
Whilst I thought about it I took the seat suspension unit apart to see if I could get it moving a bit better. Once off the bike, there isn't actually anything holding it together so a quick pull and it came apart. Inside there really isn't much going on, it's basically a spring in two tubes. The combination of filth and corrosion on the tubes meant they couldn't slide, a bit of a clean up and some grease and they were moving again. The bolt at the bottom of the spring is a preload adjuster, the washer the the spring is hooked into is threaded and when you turn the bolt this compresses the spring. I'll have to play with this once I've got the bike on the road.


Taking the engine out was a little trickier than I thought it would be. Although the engine is only mounted by 3 bolts (more about them later) I had to remove quite a few other bits to get it out. Luckily I had already removed the tank and carb so that gave me a bit more room to work. Before I got too far into it, I decided to have a look in the primary drive case simply because it's the easiest bit of the engine to have a look in. I was pleasantly surprised to find a nice clean chain that still had oil on it! I also realised I hadn't ordered enough clutch corks (I had order enough for one plate but it turns out there are two).
Once I had a bit of a nosey the cover went back on and it was back to taking the engine out. I didn't see the split link in the chain as it was covered by the chaincase so I decided to just take the chain out with the engine; it doesn't loop around the frame so doesn't have to be split. This meant I had to take the rear wheel out, which meant that the rear section of mudguard had to come off. With the rear wheel out and the chaincase removed the engine was only held in by it's mounting bolts. I had removed the front two, but the rear mount (behind the gearbox) didn't want to come out. The bolt goes in from the right hand side of the bike with a nut on the left. With the nut removed the bolt would turn, but wouldn't come out. Normally I would tap the end of the bolt with a drift but I couldn't get anything in because the primary drive case is in the way. I attempted to apply some pressure to the end of the bolt with a pry bar but I couldn't apply enough pressure or shock the bolt to get it to come out. I decided to have a think and come back to it.
Whilst I thought about it I took the seat suspension unit apart to see if I could get it moving a bit better. Once off the bike, there isn't actually anything holding it together so a quick pull and it came apart. Inside there really isn't much going on, it's basically a spring in two tubes. The combination of filth and corrosion on the tubes meant they couldn't slide, a bit of a clean up and some grease and they were moving again. The bolt at the bottom of the spring is a preload adjuster, the washer the the spring is hooked into is threaded and when you turn the bolt this compresses the spring. I'll have to play with this once I've got the bike on the road.
I bolted that back onto the saddle and had a little jump up and down, it's amazingly effective, I think the ride will actually end up quite comfortable (despite the rubbish rear shocks). I still wasn't sure what to do about the stuck engine bolt so I took the rear tyre off, stuck 6 patches on the obvious punctures, put it back together and pumped it up. There are more punctures. It's better than it was but I'll have to have another look before the weekend.
Then I really had to look at the stuck bolt otherwise it was never going to come out. I had a closer look and realised there is a spacer between the engine and the frame and that it was turning with the bolt. I really don't like the tool I used next but I only ever use them as a last resort so it's probably ok. I locked some molegrips onto the spacer and tried to turn the bolt, it was stiff but did move and I slowly managed to wind the bolt out and the engine was free!! So here's how the bike looks now
and the engine
and the hole it came from
Whilst I had been doing all this I had filled the tank with the Deox-C to clean the rust out, this worked really well but I may do another treatment. This is the solution that came out of the tank
and believe it or not the chain is in there
I have made a start on the engine rebuild but I think I'll save that for another post
Tuesday 16 September 2014
First post fun!!!!
This blog with be used to document the 'restoration' of my 1951 Automoto AV125. I say 'restoration' because I'm not doing what you'd call a proper restoration, I'm only going to go through making it run and function correctly and safely with the aim of not changing the aesthetics at all. Why you might ask? Because it looks awesome how it is now, behold:


Obviously the bike has been stood for a significant period of time so will need quite a bit of work, off the top of my head here are the things I want to look at:
- Engine - rebuild with new gaskets, seals, clutch corks and any other parts required
- Carb - strip and clean
- Petrol Tank - get rid of the rust from the inside (it's not too bad and there is a filter in the carb but better safe than sorry) and sort a new seal for the filler cap
- Front suspension - strip and clean the axles and shock, regrease and reassemble
- Rear suspension - strip the shocks and (ideally) replace the seals/bushes/whatever I can. This is probably the part of the bike I'm most concerned about
- Saddle suspension (yes really!) - strip and clean
- Chain - not too sure here but probably just a really good clean
- Left foot rest - reattach!
- Stand - acquire/design and make one as there is nothing there at the moment!
- Wheels - check condition of bearings and brake shoes
- New tyres and tubes
- New cables for throttle, choke, front brake and clutch
- Get it insured and registered with DVLA
- RIDE!
Now some of those are easier than others, for example I've already removed the tank and with a good shake I managed to get this lot out

I've found a product called Deox-c which is a water soluble crystal that removes rust. Basically I will fill the tank with it and leave it for three days and that should remove all the rust, leaving a nice clean tank and nothing to clog my carb.
Speaking of the carb, I've already taken it off off, stripped it, cleaned it and it's ready to go back on, sorry, no pics of that process.
I've also placed an order for a load of parts for the engine and hopefully they will arrive later this week so I can have a peak in the engine at the weekend.
I've set myself a target of having the bike running for the Distinguished Gentlemans Ride on Sunday September 28th. Having just looked at the website that only gives me 11 days! I'm only aiming to get the bike to a point where it will sit on the old tyres, but inflated, and run. It will not be road legal at this point, but at least it gives me a target to get something done by.
Subscribe to:
Posts (Atom)