Sunday 21 September 2014

Engine rebuild part 1 (of many probably!)

So the engine is out and I've had the delivery of parts (including an extra delivery for the forgotten corks) so I took the engine to work and started stripping it down. I didn't get many pictures of the process but I basically started by taking off the most obvious bits first and kept going until I had nothing left to remove.  I did get stuck at a few points though. The first interesting thing I found was that I was correct to order a replacement kickstart spring as there wasn't one fitted at all! There were two main problem areas, first was the main drive sprocket on the crankshaft and second was the clutch carrier (not sure of the real name). The sprocket was done up really tight and I couldn't stop the crankshaft from rotating. After several failed attempts and a bit of head scratching I took it round to the local car garage and the nut was off in seconds using their air powered impact driver. The sprocket was on the further shaft in the pic below, the part with 6 stubs coming out of it is the clutch carrier and was the next problem I had to overcome.

The nut was nowhere near as tight and I could use a pry bar in the stubs to stop it rotating so that came off really quickly. Another trip round to the garage resulted in a suitable puller, but the first attempt failed when one of the bolts I used failed. A phone call to Villiers Services (who I had ordered the spares from) confirmed that it is on a taper and simply needs enough force (and maybe a bit of heat) to get it to come off. They described their set up and it sounded exactly like mine, only with decent bolts. The taper fit is apparently an interesting quirk of Villiers engines made under license, a Villiers made engine would have a splined fit and wouldn't need to be pulled off. Some better quality bolts were found, the puller borrowed again and I was ready to try again.


It's a little bit of a 'hammer to crack a nut' but it worked. It made an almighty bang when it did release (the other guys in the shop thought I'd shot myself and I thought I'd broken something) but I'm guessing it's not been off since the engine was built so it's not a big surprise it made some noise. I could then continue with the strip down and got the whole thing apart.


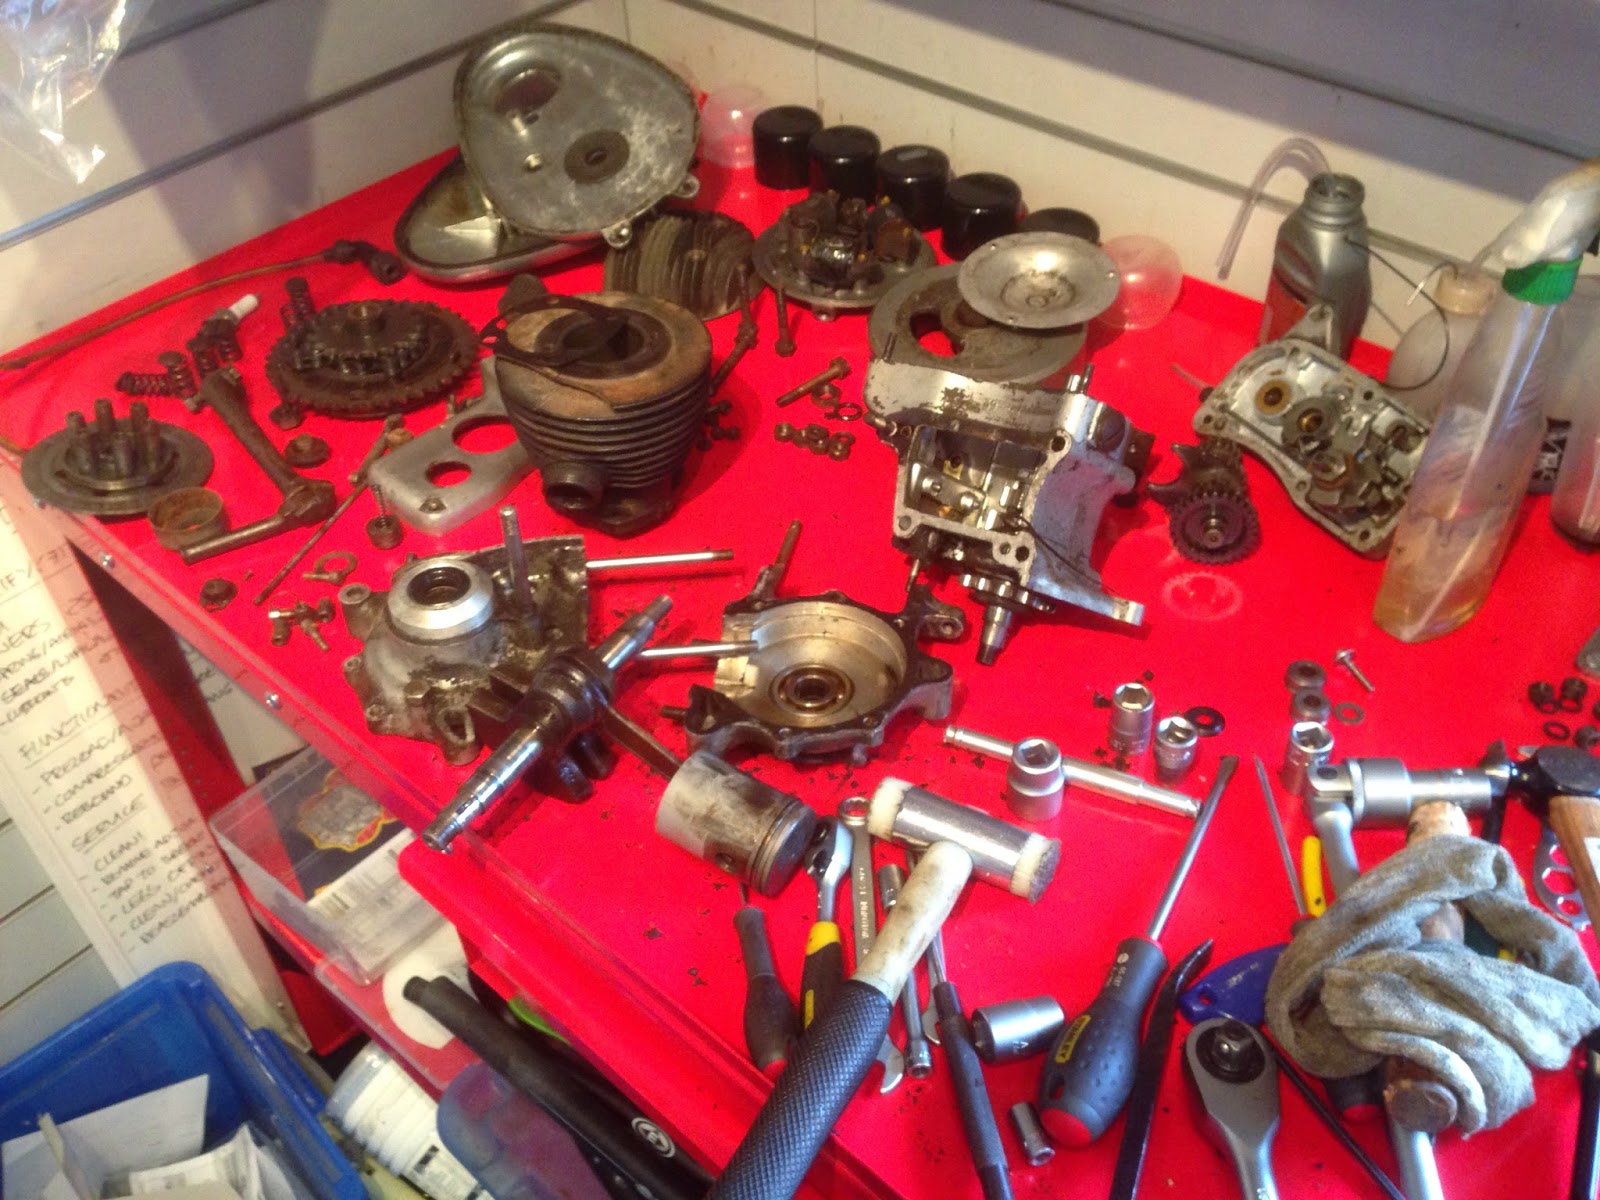
I then realised that the main bearings (particularly the chain side where there are two) are a little rough so I've ordered replacements as they are only about £4 each (I need 3). They're pretty sizeable beasts for such a small engine so it's a little bit odd they've gone but since they're so cheap I really don't mind replacing them.


 Whilst checking over the rest of the parts I had a closer look at the clutch adjuster which is renowned for being broken off by the kickstart. Mine was still intact so I decided to check it still turned so I'd be able to adjust the clutch. As soon as I tried the knob came off in my hand, on closer inspection the bolt had been cracked a long time and was only held together by about 10% of the material. This gives me a bit of a dilemma as I will need to be able to adjust the clutch but I can only find brand new (freshly chromed) adjusters which I'm not convinced will look right on the bike. The quality of the chrome doesn't look amazing (linky) but I still think it will look out of place. I could always rebuild it as it is so it will run for next Sunday and then address the adjuster at a later date. Either way I need to remove the broken stub which isn't going to be easy. If anyone has an opinion on the adjuster and how it will look, please comment. Actually, if you have anything to say about any aspect of the bike please let me know

Made some progress

Having realised I didn't have long to get the bike running for the Distinguished Gentleman's Ride, I decided to pull the engine out and get started on the rebuild.

Taking the engine out was a little trickier than I thought it would be. Although the engine is only mounted by 3 bolts (more about them later) I had to remove quite a few other bits to get it out. Luckily I had already removed the tank and carb so that gave me a bit more room to work. Before I got too far into it, I decided to have a look in the primary drive case simply because it's the easiest bit of the engine to have a look in. I was pleasantly surprised to find a nice clean chain that still had oil on it! I also realised I hadn't ordered enough clutch corks (I had order enough for one plate but it turns out there are two).


Once I had a bit of a nosey the cover went back on and it was back to taking the engine out. I didn't see the split link in the chain as it was covered by the chaincase so I decided to just take the chain out with the engine; it doesn't loop around the frame so doesn't have to be split. This meant I had to take the rear wheel out, which meant that the rear section of mudguard had to come off. With the rear wheel out and the chaincase removed the engine was only held in by it's mounting bolts. I had removed the front two, but the rear mount (behind the gearbox) didn't want to come out. The bolt goes in from the right hand side of the bike with a nut on the left. With the nut removed the bolt would turn, but wouldn't come out. Normally I would tap the end of the bolt with a drift but I couldn't get anything in because the primary drive case is in the way. I attempted to apply some pressure to the end of the bolt with a pry bar but I couldn't apply enough pressure or shock the bolt to get it to come out. I decided to have a think and come back to it.

Whilst I thought about it I took the seat suspension unit apart to see if I could get it moving a bit better. Once off the bike, there isn't actually anything holding it together so a quick pull and it came apart. Inside there really isn't much going on, it's basically a spring in two tubes. The combination of filth and corrosion on the tubes meant they couldn't slide, a bit of a clean up and some grease and they were moving again. The bolt at the bottom of the spring is a preload adjuster, the washer the the spring is hooked into is threaded and when you turn the bolt this compresses the spring. I'll have to play with this once I've got the bike on the road.

I bolted that back onto the saddle and had a little jump up and down, it's amazingly effective, I think the ride will actually end up quite comfortable (despite the rubbish rear shocks). I still wasn't sure what to do about the stuck engine bolt so I took the rear tyre off, stuck 6 patches on the obvious punctures, put it back together and pumped it up. There are more punctures. It's better than it was but I'll have to have another look before the weekend.

Then I really had to look at the stuck bolt otherwise it was never going to come out. I had a closer look and realised there is a spacer between the engine and the frame and that it was turning with the bolt. I really don't like the tool I used next but I only ever use them as a last resort so it's probably ok. I locked some molegrips onto the spacer and tried to turn the bolt, it was stiff but did move and I slowly managed to wind the bolt out and the engine was free!! So here's how the bike looks now


and the engine


and the hole it came from


Whilst I had been doing all this I had filled the tank with the Deox-C to clean the rust out, this worked really well but I may do another treatment. This is the solution that came out of the tank


and believe it or not the chain is in there

I have made a start on the engine rebuild but I think I'll save that for another post


Tuesday 16 September 2014

First post fun!!!!

This blog with be used to document the 'restoration' of my 1951 Automoto AV125. I say 'restoration' because I'm not doing what you'd call a proper restoration, I'm only going to go through making it run and function correctly and safely with the aim of not changing the aesthetics at all. Why you might ask? Because it looks awesome how it is now, behold:


Obviously the bike has been stood for a significant period of time so will need quite a bit of work, off the top of my head here are the things I want to look at:
  • Engine - rebuild with new gaskets, seals, clutch corks and any other parts required
  • Carb - strip and clean
  • Petrol Tank - get rid of the rust from the inside (it's not too bad and there is a filter in the carb but better safe than sorry) and sort a new seal for the filler cap
  • Front suspension - strip and clean the axles and shock, regrease and reassemble
  • Rear suspension - strip the shocks and (ideally) replace the seals/bushes/whatever I can. This is probably the part of the bike I'm most concerned about
  • Saddle suspension (yes really!) - strip and clean
  • Chain - not too sure here but probably just a really good clean
  • Left foot rest - reattach!
  • Stand - acquire/design and make one as there is nothing there at the moment!
  • Wheels - check condition of bearings and brake shoes
  • New tyres and tubes
  • New cables for throttle, choke, front brake and clutch
  • Get it insured and registered with DVLA
  • RIDE!
Now some of those are easier than others, for example I've already removed the tank and with a good shake I managed to get this lot out


I've found a product called Deox-c which is a water soluble crystal that removes rust. Basically I will fill the tank with it and leave it for three days and that should remove all the rust, leaving a nice clean tank and nothing to clog my carb.

Speaking of the carb, I've already taken it off off, stripped it, cleaned it and it's ready to go back on, sorry, no pics of that process.

I've also placed an order for a load of parts for the engine and hopefully they will arrive later this week so I can have a peak in the engine at the weekend.

I've set myself a target of having the bike running for the Distinguished Gentlemans Ride on Sunday September 28th. Having just looked at the website that only gives me 11 days! I'm only aiming to get the bike to a point where it will sit on the old tyres, but inflated, and run. It will not be road legal at this point, but at least it gives me a target to get something done by.